Safety Checks and Audits
Review your daily safety checks, complete a room-by-room audit, and find every compliance log.
Safety Checks and Audits
💡Who this is for
Childminders and assistants keeping their safety records up to date. Starting an audit needs the Standard plan or a free trial. The walkthrough takes about five minutes. The rest of this page is a reference for every compliance log.
KinderStart keeps two kinds of safety record: quick daily checks for things that change every day, and a room-by-room audit for things that don't, like stair gates and window locks.
1. Review your daily checks
Open the Tools tab, choose Compliance Logs, then Safety Checks. Each morning and evening check is listed with a SAFE or ISSUE badge.
2. Start an audit
Go back to Compliance Logs and choose Health & Safety Audit. Each item starts as Pass.
3. Flag anything that needs fixing
Tap Action Needed on an item and write what needs doing, like "Refit the hallway bookcase bracket this week".
4. Work through each room
Move through the six rooms, then tap Complete Audit.
5. Check the report
The audit report is dated, and lists everything marked ACTION REQUIRED with your notes.
✅Why KinderStart does it this way
Checking stair gates every morning adds nothing. Keeping daily checks for what changes, and auditing the rest room by room, gives you a record that shows your setting is reviewed properly, not just tidied before an inspection.
Reference: your compliance logs
Daily hazard checks
Daily checks are for dynamic hazards that change every day:
- Trip hazards: Toys, parent bags, or trailing wires.
- Bathroom hygiene: Toothpaste on floors, access to razors or cleaning chemicals.
- Outdoor scan: Fallen branches, animal mess, or loose gate bolts.
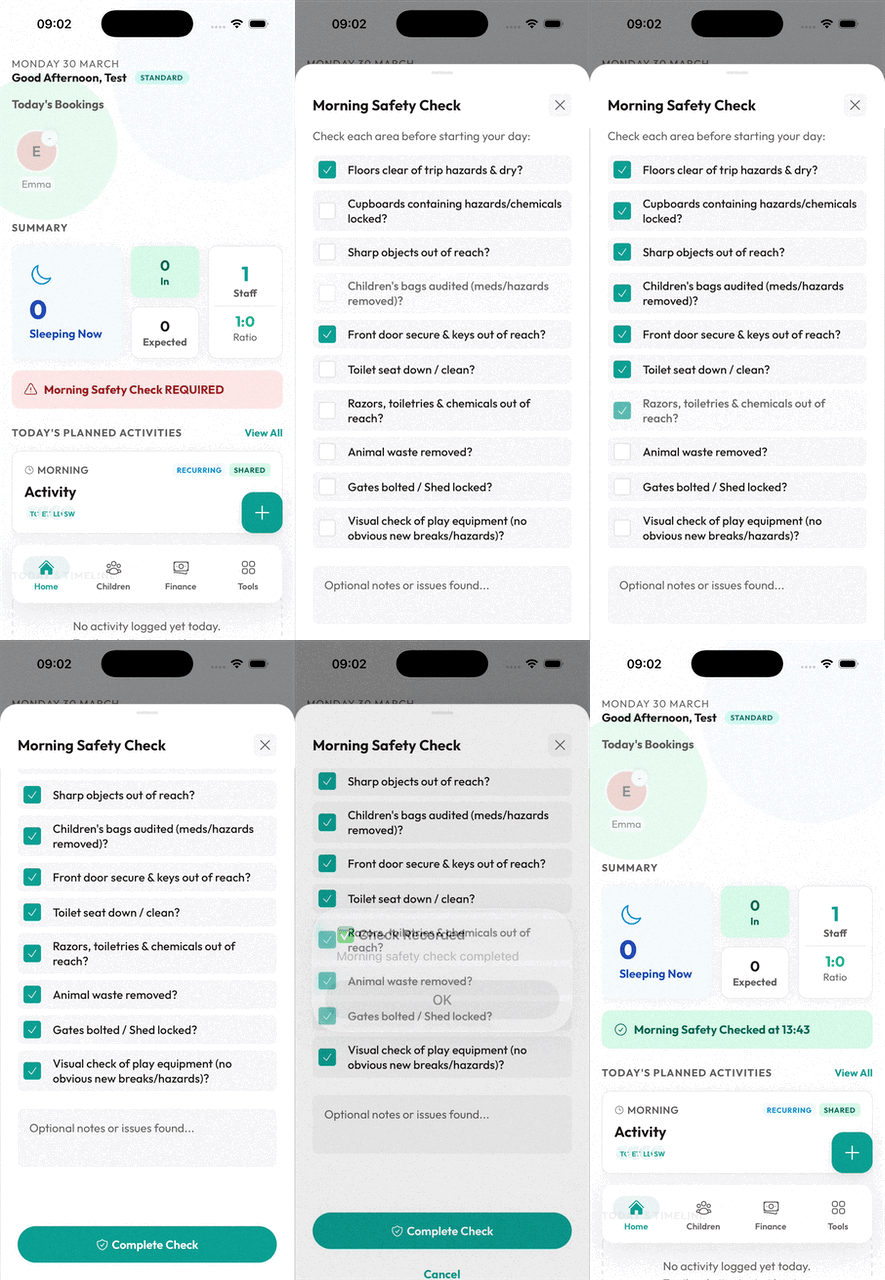
These are completed via the Daily Safety Check, which appears at the top of your Home dashboard. A "Morning Safety Check REQUIRED" card greets you first thing, and a "Close Down Check REQUIRED" card appears later in the day — tap either to work through the checklist. You must verify each item individually to ensure nothing is missed—there are no shortcuts when it comes to child safety.
Your completed safety check history is saved and can be reviewed any time via Tools → Compliance Logs → Safety Checks. Once you've completed today's check, tapping the summary card on the Daily Diary takes you straight to the same Safety Check History screen. Open any check and tap Delete check to remove one logged in error — you'll see the retention warning first, and it can be restored from Business Settings → Recently Deleted.
Reviewing Your Safety Check History
The Safety Check History screen defaults to the last 30 days, with a From Date / To Date picker at the top so you can widen or narrow the range. Two totals sit alongside it — how many checks in that range came back Safe and how many needed Issues flagged — so you can spot a pattern (a run of "action required" mornings, for instance) at a glance.
Below that, every check in the range is listed with its date, time, whether it was a Morning or Evening check, and a SAFE / ISSUE badge. Tap any entry to see the full detail: who logged it (you or an assistant), the notes recorded at the time, and an item-by-item breakdown of the checklist showing exactly which items passed and which were flagged. If that check is linked to a Risk Assessment — for example, a flagged item that led you to write one up — it's listed there too, and tapping it takes you straight to that assessment.
Tier 2: Room-by-Room Health & Safety Audit
For deeper, periodic checks of your whole setting, KinderStart includes a full Health & Safety Audit tool. This walks you through each room in turn, so nothing gets overlooked.
How to access: Go to Tools → Compliance Logs → Health & Safety Audit
The audit covers every area of your setting room by room, including:
- Hallway — entry hazards, floor surfaces, fire escape routes
- Lounge / Play area — furniture safety, toy condition, socket covers
- Kitchen — appliance safety, hygiene, chemical storage
- Bathroom — water temperature, slip hazards, chemical access
- Garden — perimeter fencing, outdoor equipment, surface safety
- Admin — record security, data storage, safeguarding notices
For each room you work through a checklist of safety items and mark each as Pass, Fail, or Not Applicable. If something fails, you can add an Action Note and upload a photo (Standard Plan) as evidence. Once you've resolved the issue, mark it as fixed — the audit then shows a complete, timestamped record of the problem and how you dealt with it.
Why it matters: Ofsted inspectors want to see that your setting is systematically reviewed, not just tidied up before they arrive. A completed audit with resolved action items is powerful evidence of ongoing, professional safety management.
Accident Reports: Complete Field Guide
Accidents happen, but how you record them is critical for safeguarding, Ofsted compliance, and your 21-year retention requirement. Every field serves a specific legal or regulatory purpose.
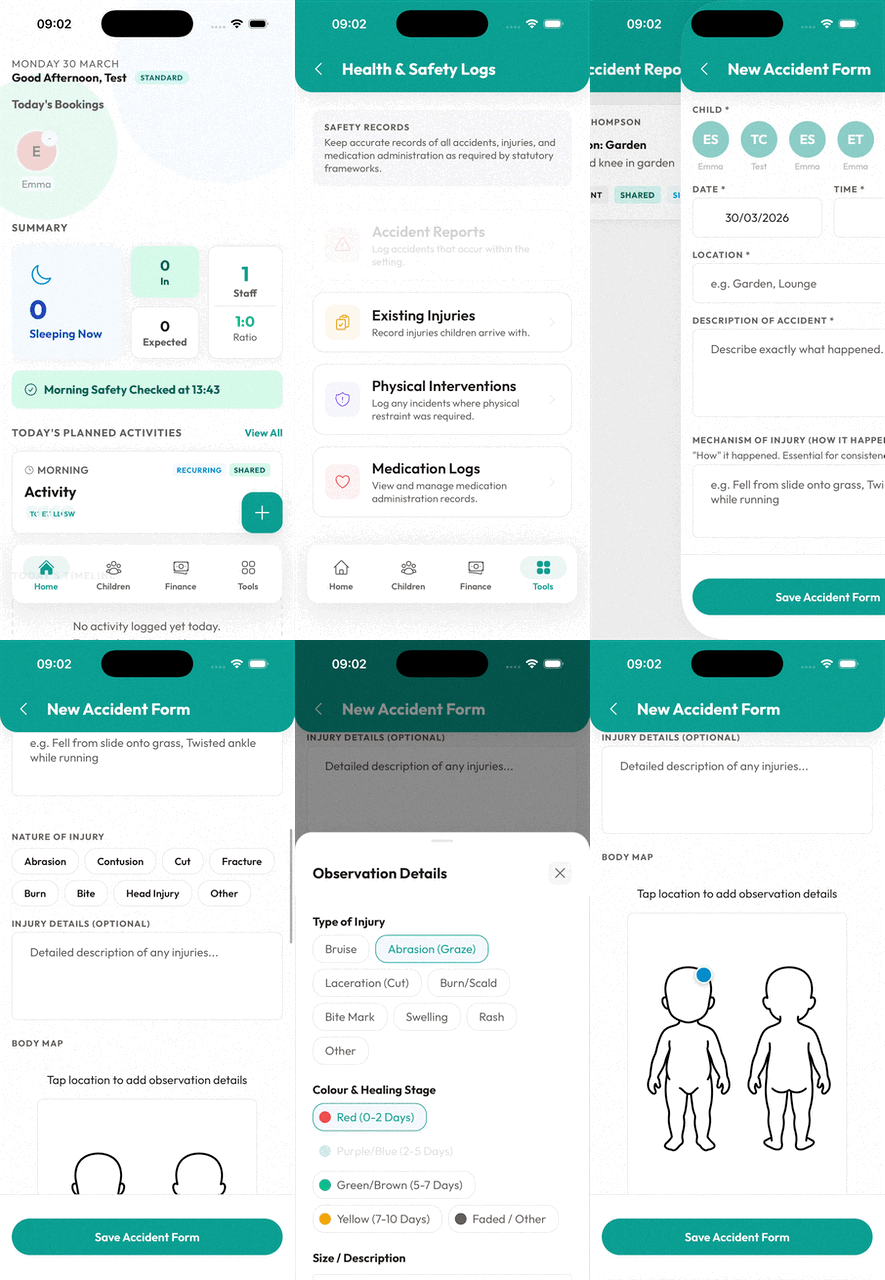
How to Create an Accident Report
- Navigate to Health & Safety Logs from the Tools menu
- Select Accident Reports
- Tap the + button to open a New Accident Form
Required Fields Explained
Child Selection (Required)
Select which child was involved in the accident. This links the report to the child's profile for pattern analysis and long-term record keeping.
Date & Time (Required)
Exact timestamp of when the accident occurred—not when you're recording it. This is legally critical for:
- Establishing custody and liability (who was responsible when it happened)
- RIDDOR reporting deadlines (must report within 15 days)
- Insurance claims and potential legal proceedings
Tip: If you're recording retrospectively (e.g., after lunch), adjust the time to match when it happened.
Severity Level (Required)
Choose between MINOR or SERIOUS:
- MINOR: Small grazes, minor bumps, superficial cuts
- SERIOUS: Head injuries, broken bones, burns, loss of consciousness, hospitalization
⚠️ Important: Selecting SERIOUS triggers an alert reminding you to notify Ofsted within 14 days and inform parents immediately (EYFS requirement).
Location (Required)
Where the accident happened (e.g., "Garden - Slide", "Kitchen", "Bathroom"). Be specific—this data enables risk assessment and pattern analysis:
- Multiple accidents at the slide? Consider safety surfacing or supervision changes
- Kitchen injuries? Review risk assessment for that area
Description of Accident (Required)
Full narrative of what happened. Include:
- What the child was doing immediately before
- Exactly how the accident occurred
- Who witnessed it
- Any contributing factors (wet floor, loose toy, etc.)
Example: "Emily was running across the garden during free play. She tripped over a toy truck left on the path and fell forward, landing on her left knee on the grass."
Mechanism of Injury
The "how" of the accident—essential for consistency checking between your description and the injury observed. This helps identify when explanations don't match injuries (potential safeguarding concern).
Examples:
- "Fell from standing height onto grass"
- "Collided with another child during running game"
- "Trapped finger in gate latch"
Nature of Injury (Multi-Select)
Categories of injury sustained:
- Abrasion
- Contusion
- Cut
- Fracture
- Burn
- Bite
- Head Injury (triggers additional guidance)
- Other
Head Injury Guidance: If selected, the app reminds you that statutory guidance recommends calling the parent immediately for all head injuries, regardless of severity.
Injuries (Description) (Required)
Detailed description of the injury itself:
- Size (e.g., "2cm graze")
- Appearance (e.g., "red with minor bleeding", "purple bruise")
- Location on body (supplemented by Body Map)
Example: "2cm linear graze on left knee, approximately 1cm wide. Light bleeding present, skin surface broken. No swelling or deformity observed."
Digital Body Map
Interactive visual diagram of a child's body (front and back views). Tap to mark exact injury locations with:
- Injury Type: Bruise, cut, burn, swelling, bite mark, etc.
- Injury Colour: Indicates age of injury
- Red (0-2 Days)
- Purple/Blue (2-5 Days)
- Green/Brown (5-7 Days)
- Yellow (7-10 Days)
Why it matters: Body maps are forensic-level evidence. They distinguish accidental injuries from abuse patterns (e.g., multiple bruises of different ages, injuries in protected areas like inner thighs or torso).
Ofsted perspective: Inspectors look for body map usage as evidence of safeguarding awareness. Saying "bruise on arm" isn't enough—show exactly where.
First Aider Name (Required)
Name of the person who administered first aid. In England, this must be someone with Paediatric First Aid certification (EYFS requirement). KinderStart auto-fills your name if you're PFA qualified.
Legal Note: Only PFA-qualified individuals can legally administer first aid in EYFS settings. If you're the only qualified person, you must always be present during operating hours.
Action Taken (Required)
Specific first aid administered:
- "Applied cold compress for 5 minutes"
- "Cleaned wound with sterile water, applied plaster"
- "Monitored child for 30 minutes, no symptoms observed"
- "Called 999 at 14:32, ambulance arrived 14:45"
This proves your duty of care was met. Vague entries like "First aid given" are insufficient.
Witnesses
Names of adults who saw the accident occur. This corroborates your account if questions arise later. Can be staff, volunteers, students, or parents present at the time.
Medical Advice Sought
Toggle ON if you:
- Called NHS 111 for guidance
- Took child to GP/walk-in centre
- Called 999 or attended A&E
⚠️ RIDDOR Alert: If medical advice was sought AND it resulted in:
- Hospitalization for more than 24 hours
- Major fracture (not fingers/toes/nose)
- Loss of consciousness
- Permanent loss of sight
...then you must report to HSE (Health & Safety Executive) under RIDDOR regulations. KinderStart flags this automatically.
Parent Notified (Toggle)
Confirms you informed the parent on the same day (EYFS requirement). Best practice:
- Call immediately for serious injuries
- Tell parent at collection for minor injuries
- Never rely solely on written notification
Parent Signature
Digital signature captured via the Parent Portal or in-person using device signature pad. This:
- Acknowledges parent was informed
- Confirms parent viewed the injury
- Provides legal protection for your setting
Tap Save Accident Form to save.
21-Year Retention: Accident reports must normally be kept for 21 years and 3 months after the child leaves your setting (Limitation Act 1980 requirement for personal injury claims). If you delete one, KinderStart shows this warning first and hides the record rather than destroying it — restore it from Business Settings → Recently Deleted.
Existing Injury Forms
When a child arrives at your setting with an existing injury (e.g., bruise from home, playground injury from weekend), document it immediately before the child begins their session.
Why This Matters
If a safeguarding concern arises, existing injury records prove the injury occurred before the child entered your care. This protects you from false allegations and demonstrates professional practice.
Ofsted tip: During inspections, they may ask about recent injuries. Having timestamped existing injury forms shows you're proactive about safeguarding.
How to Record
- Navigate to Tools → Health & Safety Logs
- Select Existing Injuries
- Tap the + button, and Save Injury Report when you're done
Required Fields Explained
Child (Required)
Select the child who arrived with the injury.
Date & Time Noticed
When you first observed the injury (typically arrival time). This timestamp proves the injury existed before the child was in your care.
Arrival Time
Optional but recommended—records exactly when the child entered your setting for additional timeline clarity.
Parent's Explanation (Required)
Critical field: This is where the parent explains how the injury occurred. Document their exact words where possible:
Examples:
- "Fell off bike in garden yesterday afternoon"
- "Bumped head on coffee table last night before bed"
- "Scraped knee at playground on Saturday"
⚠️ Safeguarding Alert: If the explanation seems inconsistent with the injury (e.g., "Bumped into door" but injury is a large, dark bruise on inner thigh), this triggers a potential "Cause for Concern." The app prompts you to consider whether a safeguarding referral is needed.
Is Explanation Consistent? (Toggle)
Professional judgment: Does the parent's explanation match the injury you're observing?
- ✅ Consistent: Explanation makes sense (e.g., graze on knee from falling while running)
- ❌ Not Consistent: Explanation doesn't match injury type, location, or severity
If you mark Not Consistent, the app creates a safeguarding alert and reminds you to:
- Document your concerns in detail
- Consult your Safeguarding Policy
- Consider contacting local authority if concern escalates
Voice of the Child
What did the child say about the injury? This is a safeguarding best practice emphasized in Serious Case Reviews:
- Children often attempt to disclose abuse through statements like "Daddy hurt me" or "Mummy pushed me"
- These disclosures are frequently dismissed when adult explanation is accepted at face value
- Always document what the child says, even if it matches the parent's story
Examples:
- "I falled over at the park" (matches parent's explanation)
- "Daddy was angry" (does NOT match parent's "fell off bed" explanation → safeguarding concern)
Body Map
Mark the exact injury location using the digital body map. Photograph the injury if consent permits (Standard Plan feature).
Pattern Analysis: Multiple existing injuries over time, or injuries in unusual locations (inner arms, inner thighs, torso) may indicate abuse. KinderStart flags patterns for your review.
Reporter Identity
Your name as the person who documented the injury. This establishes who observed and recorded the concern.
Physical Intervention Logs
UK childcare regulations require documentation of any physical restraint used to prevent harm to the child or others. This is distinct from gentle guiding (e.g., holding a toddler's hand to cross the road).
When to Use
- Restraining a child from running into traffic
- Holding a child to prevent harm to themselves (e.g., head-banging, climbing dangerous heights)
- Restraining to prevent harm to others (e.g., stopping a child mid-punch)
- Any use of physical force beyond gentle guiding or comforting holds
Not physical intervention: Picking up a crying child for comfort, holding hands during walks, helping with personal care.
How to Record
- Navigate to Tools → Health & Safety Logs
- Select Physical Interventions
- Tap the + button, and Save Physical Intervention when you're done
Required Fields Explained
Child (Required)
The child who was physically restrained.
Date & Time (Required)
When the intervention occurred.
Location (Required)
Where it happened (on-site or off-site location like "Community Park").
Intervention Type (Required)
Level of physical contact used:
- Guide: Gently redirecting movement (e.g., steering away from danger)
- Hold: Holding child still (e.g., bear hug to prevent hitting)
- Restraint: Full immobilization (e.g., holding arms and legs to prevent harm)
Legal Note: Restraint should be an absolute last resort and only when immediate danger exists. Excessive force can result in safeguarding allegations against you.
Circumstances Requiring Intervention
What was happening that made physical intervention necessary?
Example: "Charlie was attempting to climb onto the kitchen worktop to reach scissors left on the side. I had verbally asked him to stop three times. He ignored and continued climbing. I used a gentle hold to lift him down and move him away from the kitchen."
De-escalation Steps Taken
What did you try before using physical intervention?
- Verbal instructions
- Distraction techniques
- Removing other children from area
- Offering alternative activities
Ofsted expectation: Physical intervention should never be your first response. Document the steps you took to avoid it.
Duration of Intervention
How long you physically held/restrained the child (e.g., "15 seconds", "2 minutes").
Best practice: Keep interventions as brief as possible. Prolonged restraint (5+ minutes) requires additional justification and may need senior review.
Child's Response
How did the child react during and after the intervention?
- Calmed quickly and returned to play
- Continued distress, required comforting
- Became more agitated
- Self-harmed during intervention
This helps identify if your intervention strategy was appropriate or needs revision.
Any Injuries Resulting
Did the intervention cause any marks or injuries to the child (or to you)?
- Red marks from holding
- Scratches (from child's nails)
- Bruises
⚠️ Document everything: Even minor red marks must be recorded. Transparency protects you from allegations.
Post-Incident Debrief
Did you talk to the child afterward about what happened and why? This is professional practice and helps the child understand boundaries.
Example: "Once Charlie had calmed, I explained that climbing on worktops is dangerous and that I would always keep him safe. He apologized and asked if he could help me make playdough instead."
Parent Notification
Critical: Inform parents the same day—preferably before collection. Physical intervention is a sensitive topic requiring immediate, transparent communication.
Parent Portal Notification: Parents receive a detailed report via their portal. You should also discuss it verbally at pickup.
Medication Logs
Administering medication is a serious responsibility requiring precise documentation. Under EYFS regulations, you must have written parental consent and keep accurate records of all medication given.
When to Use
- Prescription medications (antibiotics, asthma inhalers, EpiPens)
- Over-the-counter medications (Calpol, antihistamines, teething gel)
- Emergency medications (EpiPen for allergic reactions)
- Ongoing medication (ADHD medication, daily vitamins if medically prescribed)
⚠️ Legal Requirement: Administer medication only with prior written parental consent and clear instructions. Never give medication without documented consent.
How to Record
- Navigate to Tools → Health & Safety Logs
- Select Medication Logs, then switch to the MAR tab to see administration records
- Tap the + button, then use the toggle at the top of the form to switch between New Consent and Log MAR — these are two different forms sharing the same screen, not one combined entry.
New Consent — recording what a parent has authorised
Fill this in once, before you ever give the medication, to record the parent's written permission:
- Child (Required) and Date & Time
- Medication Name (Required) — brand or generic name, e.g. "Calpol (Paracetamol)"
- Dosage (Required) — e.g. "5ml", "2 puffs"
- Reason for Medication (Required) — why it's needed, e.g. "Chronic asthma", "High temperature"
- Storage Requirements — e.g. "In fridge", "In locked cupboard"
- Last Dose Given by Parent (Time) — so you know when the next dose is safely due
- Expiration Date of the medication
⚠️Legal Requirement
Administer medication only once you have this written consent on file and clear instructions. Never give medication without it — except in a life-threatening emergency, where you call 999 first.
Log MAR — recording that you actually gave it
Every time you administer a dose, switch to Log MAR and fill in a fresh entry:
- Child (Required) and Date & Time of this specific dose
- Medication Name (Required) and Dosage (Required) — matching the consent on file
- Administered By — your name or the staff member who gave it (only Paediatric First Aid qualified staff should administer medication, as best practice)
- Witness Name — a second adult who saw the medication given, where possible
- Parent Signature — captured at handover to confirm the parent has seen this dose was given
Tap Save Medication Form to save.
21-Year Retention: Medication records must normally be kept for 21 years and 3 months after the child leaves, as part of the child's safeguarding and health history. KinderStart reminds you of this if you delete one, and the record can be restored from Business Settings → Recently Deleted.
Behavioral Incident Log (Multi-Child GDPR-Compliant)
When behavioral incidents occur—especially those involving multiple children—you need to document them professionally while protecting every child's privacy under GDPR. Our Behavioral Incident Log automatically redacts names for parent-facing views, ensuring only each parent sees their own child's name.
When to Use
- Peer conflicts: Physical altercations between children (hitting, pushing, biting)
- Property damage: Deliberate destruction of toys, equipment, or setting materials
- Defiance or aggression: Refusal to follow instructions, swearing, threatening behavior
- Safeguarding concerns: Any behavior that raises welfare concerns requiring documentation
Key Features
Multi-Child Selection
Select all children involved in the incident—not only the "aggressor." This creates a complete picture for your records and enables proper GDPR redaction for parent notifications.
GDPR Auto-Redaction
When parents view the incident report via their portal:
- Their child's name appears normally
- Other children are anonymized as "Child A," "Child B," etc.
- No family can identify other children involved
Example:
Incident involves Oliver, Emily, and Jack.
- Oliver's parents see: "Oliver pushed Child A during outdoor play."
- Emily's parents see: "Child A pushed Emily during outdoor play."
- Jack's parents see: "Child A pushed Child B during outdoor play. Jack witnessed the incident."
Comprehensive Data Capture
Each behavioral incident report includes:
- Date & Time: When the incident occurred
- Location: On-premises (e.g., "Garden") or off-site (e.g., "Community Park")
- Involved Children (GDPR Anonymised): Multi-select with roles (primary child, peers involved)
- Antecedent / Trigger: What happened immediately before the incident
- Example: "Emily took Oliver's toy without asking."
- Incident Description *: Detailed description of what occurred
- Example: "Oliver responded by pushing Emily backward. Emily fell onto soft play mat and began crying. No visible injuries."
- Action Taken: Immediate response and resolution
- Example: "Separated children, provided comfort to Emily. Spoke to Oliver about using words instead of hands. Both children apologized and played separately for remainder of session."
- Follow-Up Required: Checkbox for ongoing monitoring or parent meetings
Time-Stamped Addendums
After creating the initial report, add Addendums with timestamps—perfect for recording:
- Updates on child's behavior later that day
- Parent conversations and their responses
- Follow-up actions taken (e.g., "Met with parents on [date]. Agreed on consistent language strategies at home and setting.")
- Behavioral patterns observed over subsequent days
Every addendum is permanently timestamped, creating an immutable audit trail that Ofsted values during inspections.
Parent Visibility Toggle
Use the "Share with Parent?" toggle to control whether parents see the incident in their portal:
- ON: Parents receive notification and can view (with GDPR redaction)
- OFF: Internal record only—useful for preliminary notes you'll discuss in person
Best practice: Turn it ON after speaking to parents directly, so they have written documentation to refer to.
How to Create a Behavioral Incident Report
- Navigate to Tools → Health & Safety Logs
- Select Behavioural Incidents
- Tap the + button
- Select Children Involved:
- Tap each child who was part of the incident
- Select 2+ children for multi-child incidents
- Set Date & Time: Defaults to now, adjust if recording retrospectively
- Choose Location: On-premises dropdown or type custom off-site location
- Antecedent / Trigger: Describe what triggered the incident
- Incident Description *: Full narrative of what occurred
- Action Taken: Your immediate response and resolution
- Follow-Up Required: Check if ongoing monitoring needed
- Share with Parent?: Toggle ON if parents should be notified
- Save Incident Report
Parents receive an URGENT priority notification if "Share with Parent" is enabled, ensuring immediate visibility for serious incidents.
21-Year Retention
Behavioural incident reports are subject to 21-year retention under the Limitation Act 1980 (personal injury claims). KinderStart:
- Shows the retention warning if you delete one, and hides the record rather than destroying it — restore it from Business Settings → Recently Deleted
- Includes these records in child data exports for archival
- Timestamps every report and addendum
Real-World Example
Scenario: Biting incident during lunch involving two children.
Your documentation:
- Involved Children (GDPR Anonymised): Select both Oliver (biter) and Emily (bitten)
- Antecedent / Trigger: "Emily reached across Oliver to grab the fruit bowl during lunch."
- Incident Description *: "Oliver bit Emily on the right forearm, leaving visible teeth marks. Emily cried immediately. I separated them and applied cold compress."
- Action Taken: "Examined Emily's arm—skin unbroken, slight redness. Applied body map marking and photographed injury. Spoke to Oliver about using words: 'Emily, I wasn't finished.' Called both parents to report incident. Emily's parent arrived early to collect; viewed injury and signed accident report digitally via parent portal."
- Follow-Up Required: ✅ Checked
- Share with Parent?: ✅ ON
Addendum (3 hours later):
"Oliver's parent arrived at collection and was briefed. Parent expressed surprise as this is first biting incident. Agreed to reinforce 'use words, not teeth' at home. Will monitor Oliver's lunchtime behavior over next week."
Result:
- Oliver's parents see: "Oliver bit Child A on the right forearm during lunch..."
- Emily's parents see: "Child A bit Emily on the right forearm during lunch..."
- Both reports show the full narrative with their own child's name visible
- Ofsted can review the complete unredacted report showing both children's names
Action Plans: Turning Problems into Evidence
If you find a problem during an audit (e.g. "Kitchen cupboard lock is broken"), mark it as "Action Needed". This creates a timestamped evidence trail of your proactive maintenance:
- Add Action Notes: Describe exactly what needs fixing.
- Upload Photo Evidence: (Standard Plan) Take a photo of the hazard in situ.
- Confirm the Fix: Once resolved, the audit reflects the completed action, proving your proactive approach to setting maintenance.
💡Risk vs. Benefit
Risk-Benefit Analysis. Ofsted now expects to see "Risk-Benefit" analysis for risky play (like tree climbing). In your KinderStart Risk Assessment, include a Benefit field to justify why the child is taking the risk. It shows you're supporting their development, not avoiding accidents.
Visitor Log
Anyone who isn't a parent, child, or regular staff member — a meter reader, an Ofsted inspector, a maintenance contractor — gets logged here, same Compliance Logs area as everything else in this guide.
- Visitor Name (Required), Company, and Purpose of Visit — e.g. "Ofsted" or "Maintenance"
- ID Checked? — a toggle confirming you verified who they actually are
- Entry Time and Exit Time
- Include Signature? — an optional toggle that, when on, captures the visitor's signature confirming their presence and that their ID was checked
Complaints Log
A record of any complaint raised by a parent, separate from your day-to-day incident and accident logs:
- Complainant (Required) — pick from your existing parents, or enter a name manually
- Subject (Required) — a short summary of what the complaint is about
- Description — the full detail of what was raised
- Action Taken and Outcome / Resolution — how you responded and how it was resolved
⚠️The 28-day rule
Written complaints must be investigated and the complainant told the outcome within 28 days — keep this log up to date as the complaint progresses, not just filled in once it's closed.
Next guide
Fire Safety Records
Ready to try KinderStart?
Start your free trial and put these guides into action.
Subscribe to start your 7-day free trial • Cancel anytime
KinderStart strives for accuracy. Competitor features and pricing comparisons are based on publicly available information as of May 2026. Details are subject to change by respective providers.