Adding Children & Parents: Complete Onboarding
Every field in child and parent registration explained, so invoices, funding claims and emergency information are right from day one.
Adding Children & Parents: Complete Onboarding
Accurate child and parent profiles unlock everything in KinderStart—correct invoices, funded hours claims, Ofsted-ready records, and instant access to allergy and emergency information when it matters most. This guide covers every field in the child registration process and explains why each piece of information matters.
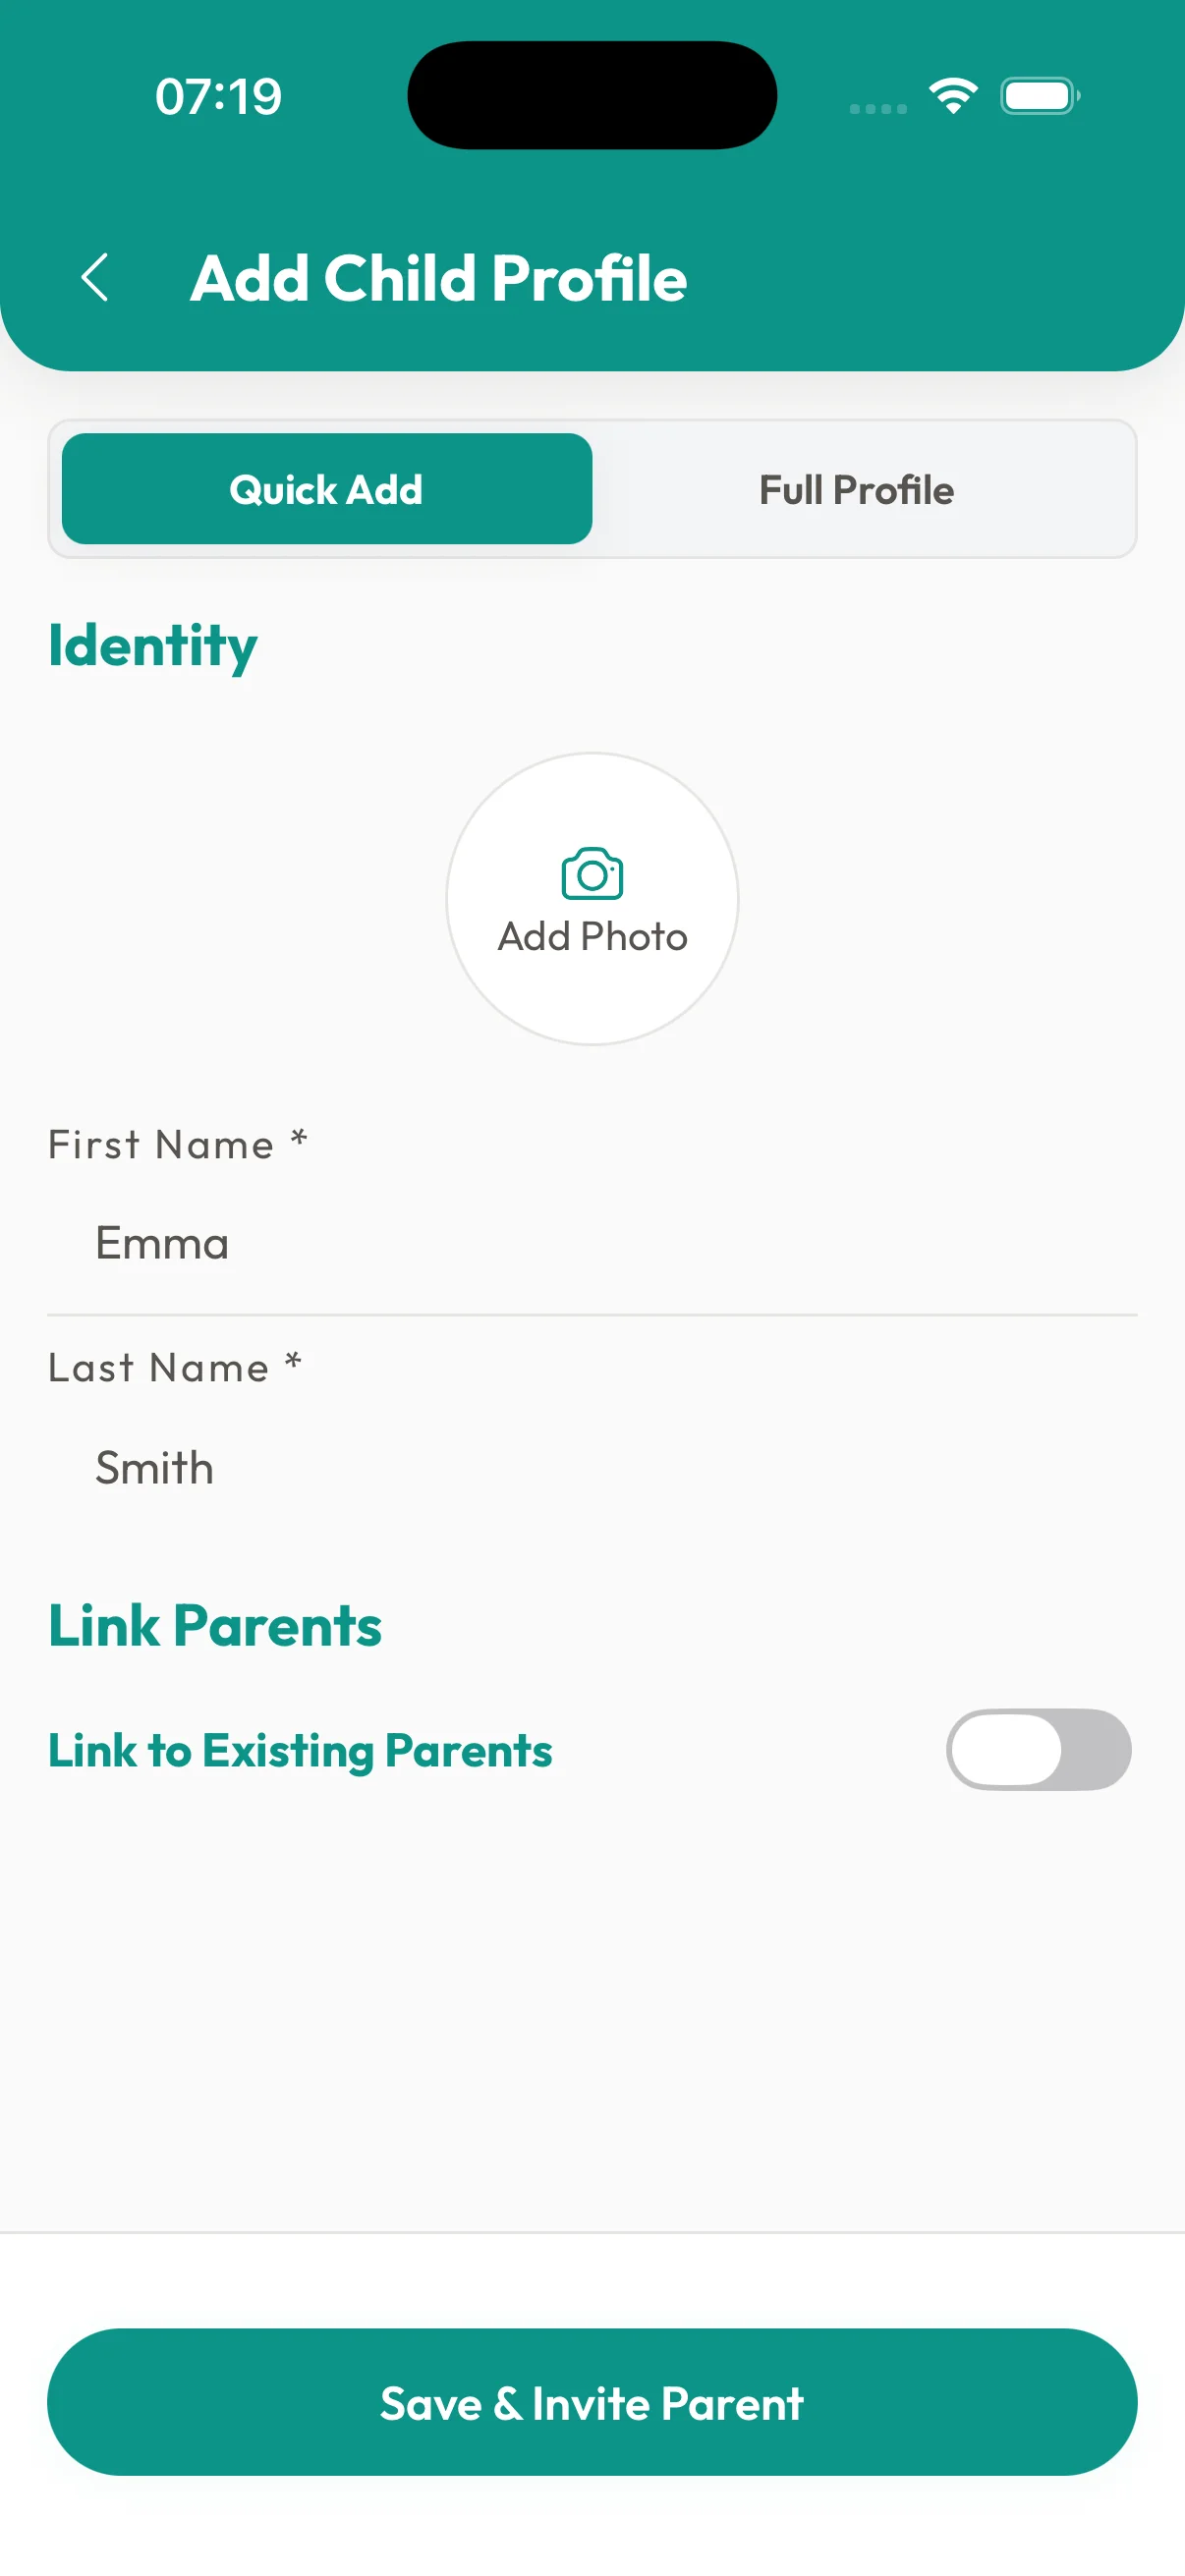
Add Child Form
Why Complete Profiles Matter
Accurate data ensures:
- ✅ Correct invoicing and funding claims
- ✅ Emergency contact information available instantly
- ✅ Age-appropriate activity planning
- ✅ Safeguarding and allergy alerts
- ✅ GDPR-compliant record keeping
- ✅ Ofsted inspection readiness
💡GDPR Compliance
Data Protection Built-In
KinderStart is fully GDPR-compliant. KinderStart encrypts and stores all personal data securely, accessible only to you. Parents have the right to view, update, or delete their data at any time.
The 4-Step Child Registration Wizard
KinderStart offers two ways to add a child: Quick Profile (basic details only) and Full Profile (comprehensive 4-step wizard). For complete child records, use the Full Profile wizard, which guides you through:
Step 1 of 4: The Basics (Identity & Core Details)
What you'll capture:
- Personal details (First Name, Last Name, DOB, Gender)
- Core details (Address, Ethnicity, Home Language, Religion)
- Emergency contacts
Time to complete: 3-5 minutes
Progress indicator: "Step 1 of 4" displayed at top of screen
Step 2 of 4: Health & Safety
What you'll capture:
- Allergies (critical for safety)
- Medical conditions (asthma, diabetes, etc.)
- Dietary requirements (vegetarian, halal, gluten-free)
- Additional care notes
Time to complete: 2-3 minutes
Why this step matters: Medical information affects daily care, meal planning, and emergency response procedures.
Step 3 of 4: [Contracts & Funding]
What you'll capture:
- Contract selection or creation
- Funded hours eligibility (15 hours / 30 hours)
- Start date and schedule
Time to complete: 3-5 minutes (if using existing contract template)
Optional: Skip this step and add contracts later from the child's profile.
Step 4 of 4: [Parent Contacts]
What you'll capture:
- Parent/guardian details (name, email, phone)
- Relationship to child
- Portal access permissions
- Additional emergency contacts
Time to complete: 3-5 minutes per parent
Best practice: Add at least one parent before completing, add additional parents/guardians afterward if needed.
Wizard benefits:
- ✅ Progress saved automatically between steps
- ✅ Can't skip required fields
- ✅ Clear visual progress indicator
- ✅ Can exit and resume later
- ✅ All essential information captured in one flow
After completion: KinderStart creates the child profile and adds it to your Children list, ready for daily diary logging, observations, and contract management.
Child Profile: Field-by-Field Guide
Every field in the child registration process is covered below, organised by wizard step.
Step 1: The Basics - Personal Details
Personal Details
First Name - REQUIRED
- Legal first name as on birth certificate
- Used for formal documents (contracts, reports, Ofsted logs)
- Character limit: 50
- Examples: "Emma", "Mohammed", "Lily-Rose"
Why it matters: Invoices and official reports use this name
Last Name - REQUIRED
- Family surname
- Used in alphabetical sorting
- Appears on all documents
- Character limit: 50
Preferred Name - OPTIONAL
- What the child likes to be called
- Used in daily app interactions, observations, diary entries
- Examples: "Emmie" (for Emma), "Mo" (for Mohammed)
Why it matters: Makes app communications feel personal and child-centred
Date of Birth - REQUIRED
- Select from calendar picker
- Format: DD/MM/YYYY
- Used to calculate:
- Current age (for EYFS stages)
- Eligibility for funded hours
- Readiness for 2-year check
- Contract rate changes
Birth Date Accuracy Critical
Funding Eligibility
Local Authorities verify birth dates when processing funded hours. An incorrect DOB can result in:
- Funding application rejection
- Payment delays
- Audit flags
Gender - REQUIRED
Select one:
- Male
- Female
- Prefer not to say
Why it matters:
- EYFS observations sometimes reference gender-specific developmental milestones
- Ofsted data reporting
- Respectful record-keeping
Ethnicity - OPTIONAL (but recommended)
Select from dropdown (Ofsted-aligned categories):
- White British
- White Irish
- White Other
- Mixed: White and Black Caribbean
- Mixed: White and Black African
- Mixed: White and Asian
- Mixed: Other
- Asian or Asian British: Indian
- Asian or Asian British: Pakistani
- Asian or Asian British: Bangladeshi
- Asian or Asian British: Other
- Black or Black British: Caribbean
- Black or Black British: African
- Black or Black British: Other
- Chinese
- Other Ethnic Group
- Prefer not to say
Why it matters:
- Ofsted data monitoring
- Ensures culturally appropriate care
- Celebrates diversity in your setting
Home Language - OPTIONAL (but recommended)
- Language spoken at home by family
- Examples: "English", "Polish", "Urdu", "Spanish"
Why it matters:
- Informs communication strategies
- Supports bilingual development planning
- Alerts you to potential language support needs
Multi-lingual homes: List primary language
Religion - OPTIONAL
- Free text field
- Examples: "Christian", "Muslim", "Hindu", "None", "Prefer not to say"
Why it matters:
- Respects dietary requirements (e.g., Halal, Kosher)
- Informs cultural celebrations and activities
- Supports inclusive care planning
Start Date - REQUIRED
- The child's first official day in your care
- Format: DD/MM/YYYY
- Cannot be in the future (for new registrations)
- Used to calculate:
- Length of time in care
- Contract anniversary
- Settling-in period end date
Why it matters: Determines when invoicing and attendance tracking begins
Address Details
Why collect address:
- Contract requirement
- Emergency services need to know child's home location
- Local Authority funding requires proof of residency
- Safeguarding records
House/Flat Number - OPTIONAL
- Examples: "12", "Flat 3A", "Rose Cottage"
Street Name - REQUIRED
- Full street name
- Examples: "High Street", "Oak Drive", "The Avenue"
Town/City - REQUIRED
- Examples: "Manchester", "Brighton", "Cardiff"
County - OPTIONAL
- Examples: "Greater Manchester", "East Sussex", "South Wales"
Postcode - REQUIRED
- UK postcode format
- Examples: "M1 1AE", "BN1 3XB"
- Used for:
- Local Authority funding allocation
- Emergency services
- Distance calculations (for mileage claims)
✅Pro Tip: Verify Postcode
Royal Mail Lookup
If parents are unsure of their exact postcode, use Royal Mail's postcode finder before saving. Incorrect postcodes can delay funding applications.
Medical & Dietary Information
Allergies - OPTIONAL (but critical)
- List all known allergies
- Examples:
- "Dairy - causes eczema"
- "Peanuts - anaphylaxis risk (EpiPen in bag)"
- "Cat hair - mild sneezing"
- Include severity and treatment
Why it matters:
- Life-saving information
- Displayed prominently in attendance register
- Alert appears when planning meals/activities
- Ofsted compliance (allergies in care plan)
No allergies? Write "None known"
Dietary Requirements - OPTIONAL (but important)
- List any dietary preferences or restrictions
- Examples:
- "Vegetarian"
- "Halal meat only"
- "No dairy (lactose intolerant)"
- "Gluten-free (Coeliac disease)"
Why it matters:
- Meal planning
- Invoice line items (if you charge for meals)
- Respectful, inclusive care
Medical Conditions - OPTIONAL (but critical)
- List any ongoing health conditions
- Examples:
- "Asthma - blue inhaler in bag"
- "Type 1 Diabetes - insulin managed by parents"
- "Epilepsy - rescue medication (Midazolam)"
- Include medication details
Why it matters:
- Emergency response preparedness
- Activity adaptations (e.g., asthma and vigorous outdoor play)
- Ofsted care plan requirement
- Safeguarding responsibility
⚠️Medication Consent Required
Administering Medication
If a child needs regular medication (e.g., inhaler, EpiPen), you MUST have:
- Written parental consent
- Medication administration training
- Logged doses in KinderStart
Never administer medication without explicit written consent.
Additional Notes - OPTIONAL (but valuable)
Free text field for any other relevant information:
- Settling-in observations: "Shy at first, warms up after 20 minutes"
- Comfort objects: "Needs teddy for nap time"
- Behavioral notes: "May bite when frustrated—working on it"
- Potty training: "Learning to use toilet, prefers potty"
- Special interests: "Loves dinosaurs and vehicles"
Character limit: 1,000 characters
Why it matters:
- Personalized care planning
- Continuity if you have an assistant
- Quick reference for daily interactions
Parent/Guardian Details
Every child must have at least one parent/guardian added. Add multiple if needed (e.g., mum, dad, grandparent).
Parent Details Form
Parent/Guardian Type - REQUIRED
Select one:
- Mother
- Father
- Guardian (e.g., grandparent, foster carer, adoptive parent)
- Emergency Contact (for non-parent primary contacts)
First Name - REQUIRED
- Parent's legal first name
- Used in invoices, contracts, communications
Last Name - REQUIRED
- Parent's legal surname
- Used for formal documents
Email Address - REQUIRED
- Must be unique (one email per parent account)
- Used for:
- Parent portal login
- Invoice delivery
- Observation sharing
- Emergency notifications
- Format validation: Must be valid email (e.g., [email protected])
Shared Emails Not Allowed
One Email Per Parent
Each parent must have their own email address. Shared emails (e.g., "[email protected]") prevent individual portal access and can cause login issues.
Solution: If only one email available, add secondary parent as "Emergency Contact" without portal access.
Phone Number - REQUIRED
- Mobile preferred (for emergency calls/texts)
- Format: UK mobile or landline
- Examples: "07912 345678", "020 1234 5678"
Why it matters:
- Emergency contact
- Pickup confirmation
- Quick questions during day
Relationship to Child - AUTO-FILLED
Based on Parent/Guardian Type selection
Address - OPTIONAL
- If parent lives at same address as child, leave blank
- If separated parents, add second address for:
- Pickup/drop-off locations
- Emergency scenarios
Portal Access - DEFAULT: YES
Toggle to control if parent can:
- View observations and diary entries
- See invoices and make payments
- Update their own details
- Communicate via messaging
When to disable:
- Court order restricts access
- Parent uninvolved in childcare decisions
- Emergency contact only (e.g., work colleague backup)
Adding Multiple Parents
For two-parent families:
- Complete first parent form (usually primary contact)
- Tap "Add Another Parent"
- Fill second parent form
- Both parents receive portal invitations
- Both parents see child's data in their apps
Separated parents:
- Both can have full portal access (unless court order)
- Each receives separate invoices if billing separately
- Observations visible to both (fosters co-parenting)
Emergency Contacts
In addition to parents, add 2-3 emergency contacts:
- Tap "Add Emergency Contact"
- Enter:
- Name
- Relationship (e.g., "Aunt", "Neighbor", "Family Friend")
- Phone number
- Pickup authorization (YES/NO)
- Repeat for additional contacts
Why it matters:
- If parents unreachable in emergency
- Backup for early pickup
- School/nursery drop-off needs
Ofsted requirement: At least 2 emergency contacts beyond parents
Child Profile Photo - OPTIONAL (but recommended)
Tap "Add Photo" to:
- Take photo with camera
- Choose from gallery
- Crop to square
Why add a photo:
- Quick visual identification
- Personalizes observations and reports
- Makes app feel warm and child-focused
Privacy: Photos never leave KinderStart—not used in marketing, not shared externally
Contracts & Funding
After creating a child profile, you'll be prompted:
"Would you like to create a contract for [Child Name]?"
- Yes → Redirects to Contract Creation (see Contracts Guide)
- No → Add contract later
"Does [Child Name] receive funded hours?"
- Yes → Opens funding setup form:
- Select funding type (15 hours / 30 hours)
- Enter LA reference number
- Set term dates
- No → Funded hours not tracked for this child
✅Pro Tip: Complete Setup Fully
Don't Skip Contracts
Add a child without a contract, but you won't be able to:
- Generate invoices
- Track funded hours
- Set hourly rates
Complete the full onboarding flow to unlock all features.
Onboarding Workflow
Ideal onboarding sequence:
- Pre-registration: Send parents "Registration Form" link via KinderStart
- Parents complete: Basic details (name, DOB, address, allergies)
- You review: Check accuracy, add notes
- You add: Contracts, funding, specific care needs
- Welcome pack: Generate PDF welcome pack (includes policies, contract, first day info)
- Portal invitation: Automatically sent when child profile saved
Timeline: Complete onboarding 1 week before start date
Editing Child Profiles
After saving:
- Tap child's name in Children List
- Tap "Edit Profile" (top right)
- Update any field
- Tap "Save Changes"
Edit history logged for audit trail (Ofsted/safeguarding)
Archiving Children
When a child leaves your care:
- Open child profile
- Tap "Archive Child" (bottom of screen)
- Enter leaving date
- Add leaving reason (optional):
- Moved to school
- Family relocated
- Changed childcare provider
- Other
- Confirm archive
Archived children:
- Removed from active lists
- All data retained (GDPR/Ofsted compliance)
- Can be unarchived if they return
- Still appear in historical reports
Retention period: 3 years after leaving (KinderStart auto-manages)
Understanding Child List View
Your Children List shows:
- Active children: Current attendees
- Starting soon: Children with future start dates
- Archived: Children who have left (toggle to view)
Sort options:
- Alphabetical (A-Z)
- By age (youngest first / oldest first)
- By start date (newest / longest attending)
Search: Type child name to filter instantly
Family Linking
If you care for siblings:
- Add first child fully
- When adding second child, KinderStart detects matching surname
- Prompt: "Is [Child 2] related to [Child 1]?"
- Select "Yes, sibling"
- KinderStart:
- Links profiles
- Auto-fills parent details
- Applies sibling discounts (if configured)
- Groups children in Family View
Family View benefits:
- See all siblings together
- Combined invoicing option
- Shared parent communications
- Easier pickup tracking
Ofsted Inspection Readiness
When Ofsted inspects, they'll check:
"Can I see your register of children?"
Response:
- Open Children List in KinderStart
- Show each child profile with:
- Full name and DOB
- Start date
- Parent contact details
- Emergency contacts
- Allergies and medical conditions
- Address
- Verbal confidence: "All children's details are complete, up-to-date, and GDPR-compliant in our secure system."
Ofsted will mark you down if:
- Incomplete profiles (missing emergency contacts)
- Out-of-date information (e.g., old phone numbers)
- No allergy information recorded
- No parent consent for data storage
KinderStart prevents all of these with required fields and data validation
Common Questions
"Do I need parent permission to store their data?"
Yes. Your welcome pack and contract should include:
- Data protection notice
- How you use their information
- Their rights (access, deletion, update)
- KinderStart's GDPR compliance
Parents signing the contract = consent to data processing
"What if parents refuse to give allergy information?"
Explain it's a safeguarding requirement. If they still refuse, document their refusal in writing. You cannot safely care for a child without knowing potential health risks.
"Can I add children before their start date?"
Yes! Enter future start date. Child appears in "Starting Soon" list. Start building contract and planning before their first day.
"How do I handle separated parents with disputes?"
- If court order restricts one parent's access: Disable their portal access and document the order
- If no court order: Both parents have equal rights to information
- If conflict arises: Remain neutral, provide equal information to both, and suggest mediation
"What if parent details change (new phone, address)?"
- Parent can update: Via their portal
- You can update: Edit child profile → Parent Details
- Changes logged in audit trail
- Update contracts if address affects billing
Next Steps After Adding Child
- ✅ Create contract (sets hourly rate, funded hours)
- ✅ Configure funding (if applicable)
- ✅ Generate welcome pack PDF for parents
- ✅ Send parent portal invitation
- ✅ Add child to recurring attendance patterns
- ✅ Prepare first day (name label, coat peg, etc.)
Ready to try KinderStart?
Start your free trial and put these guides into action.
Subscribe to start your 7-day free trial • Cancel anytime
KinderStart strives for accuracy. Competitor features and pricing comparisons are based on publicly available information as of May 2026. Details are subject to change by respective providers.